
- Part 1: In order to create great images like the one above using Midjourney, it really helps if you understand how the technology works under the hood. In this post I will show how image generators like Midjourney or Dall-E are able to create images.
- Part 2: This is the basics of getting started with Midjourney, and then showing how our knowledge of image generators can be applied to create better results.
Part 1: How do image generators work?
Generative AI refers to a type of artificial intelligence that is capable of generating new content, such as images, videos, music, or text, that is similar to what a human might produce.
Unsurprisingly, each medium requires a different type of AI process to create the media for it. In this post we will focus on a quick summary of how the latest artificial intelligence based image generators work.
There are many methods for creating images using AI but the most popular services like Dall-E, Stable Diffusion and Midjourney use a diffusion model process. The diffusion model is based on the principle of "diffusing" noise (adding noise at regular intervals) throughout the neural network to generate starting outputs.
During training the model is given an image, for example a cat. At each step, the image is mixed with some random noise, and the model is trained to remove it. By training the network in small incremental steps it can eventually be taught to generate a clean image of the cat from an image of pure noise.
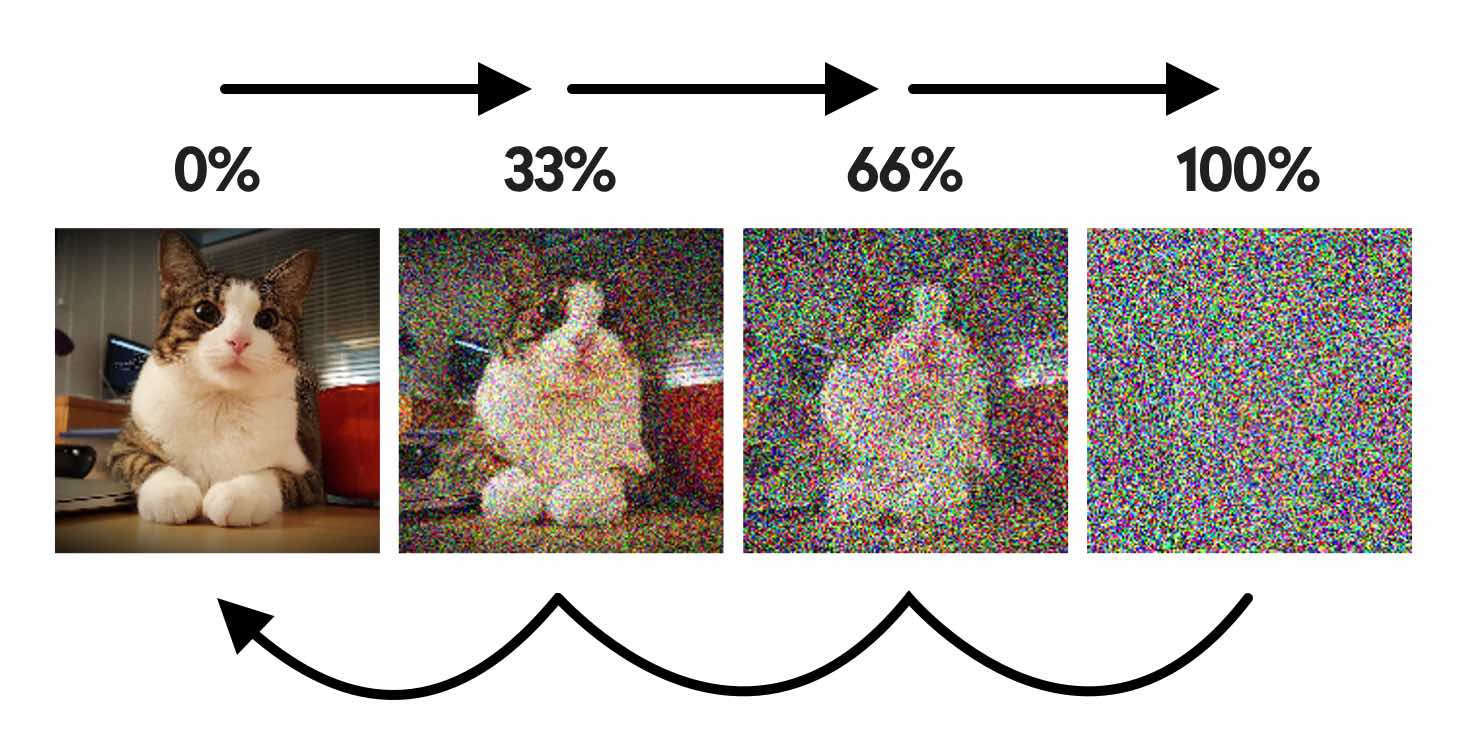
Once the training has been completed we will have a neural network that is very good at removing any amount of noise from any pictures of cats with varying amounts of noise added. If we now take it a step further and give it a new random noise image, it will try to remove the noise and create us a brand new picture of a cat!
Unfortunately, the first image produced by this method is never very usable, but it turns out that if that image is fed back into the network the next image produced is a little bit closer to a cat. By repeating this process we can get an image of what the neural network thinks the original image was even though it was given pure noise at the beginning.
When you generate an image using Midjourney or a similar tool, you will see a gradually resolving image as it progresses. This is the predicted image being fed back into the network for another run at it.
Thoughts
Since all the training images are associated with specific keywords, the creation process now becomes a game of guessing which keywords will coax the best images from the neural network. As you can imagine, this makes for an exceedingly hit or miss experience when creating imagery. Let’s take a look at what Midjourney specifically is doing to overcome these limitations.
Part 2: Midjourney
Some of my first commercial work as a digital artist was creating imagery for the homepage of the fashion company, United Colors of Benetton. I did this work by taking their existing imagery and manipulating it to look like torn posters. 'Photoshopping’ images like this has changed surprisingly little as a technique in the last twenty years or so. It has roughly the same layout of tools and the same workflow as it did when I first started. Midjourney is a completely new form of artistic creation so I was very interested to see if I could create professional quality work with it.
Getting started with Midjourney
Midjourney is very unusual as it doesn’t work like traditional software. It doesn’t have a website or even an app, instead it uses the popular gaming chat service Discord as the way to create images.
You can download Discord for Mac, Windows, iOS or Android but you will find it easier to use on a larger screen because there is more space to examine your images.
- Download Discord then tap login to register yourself an account for free.
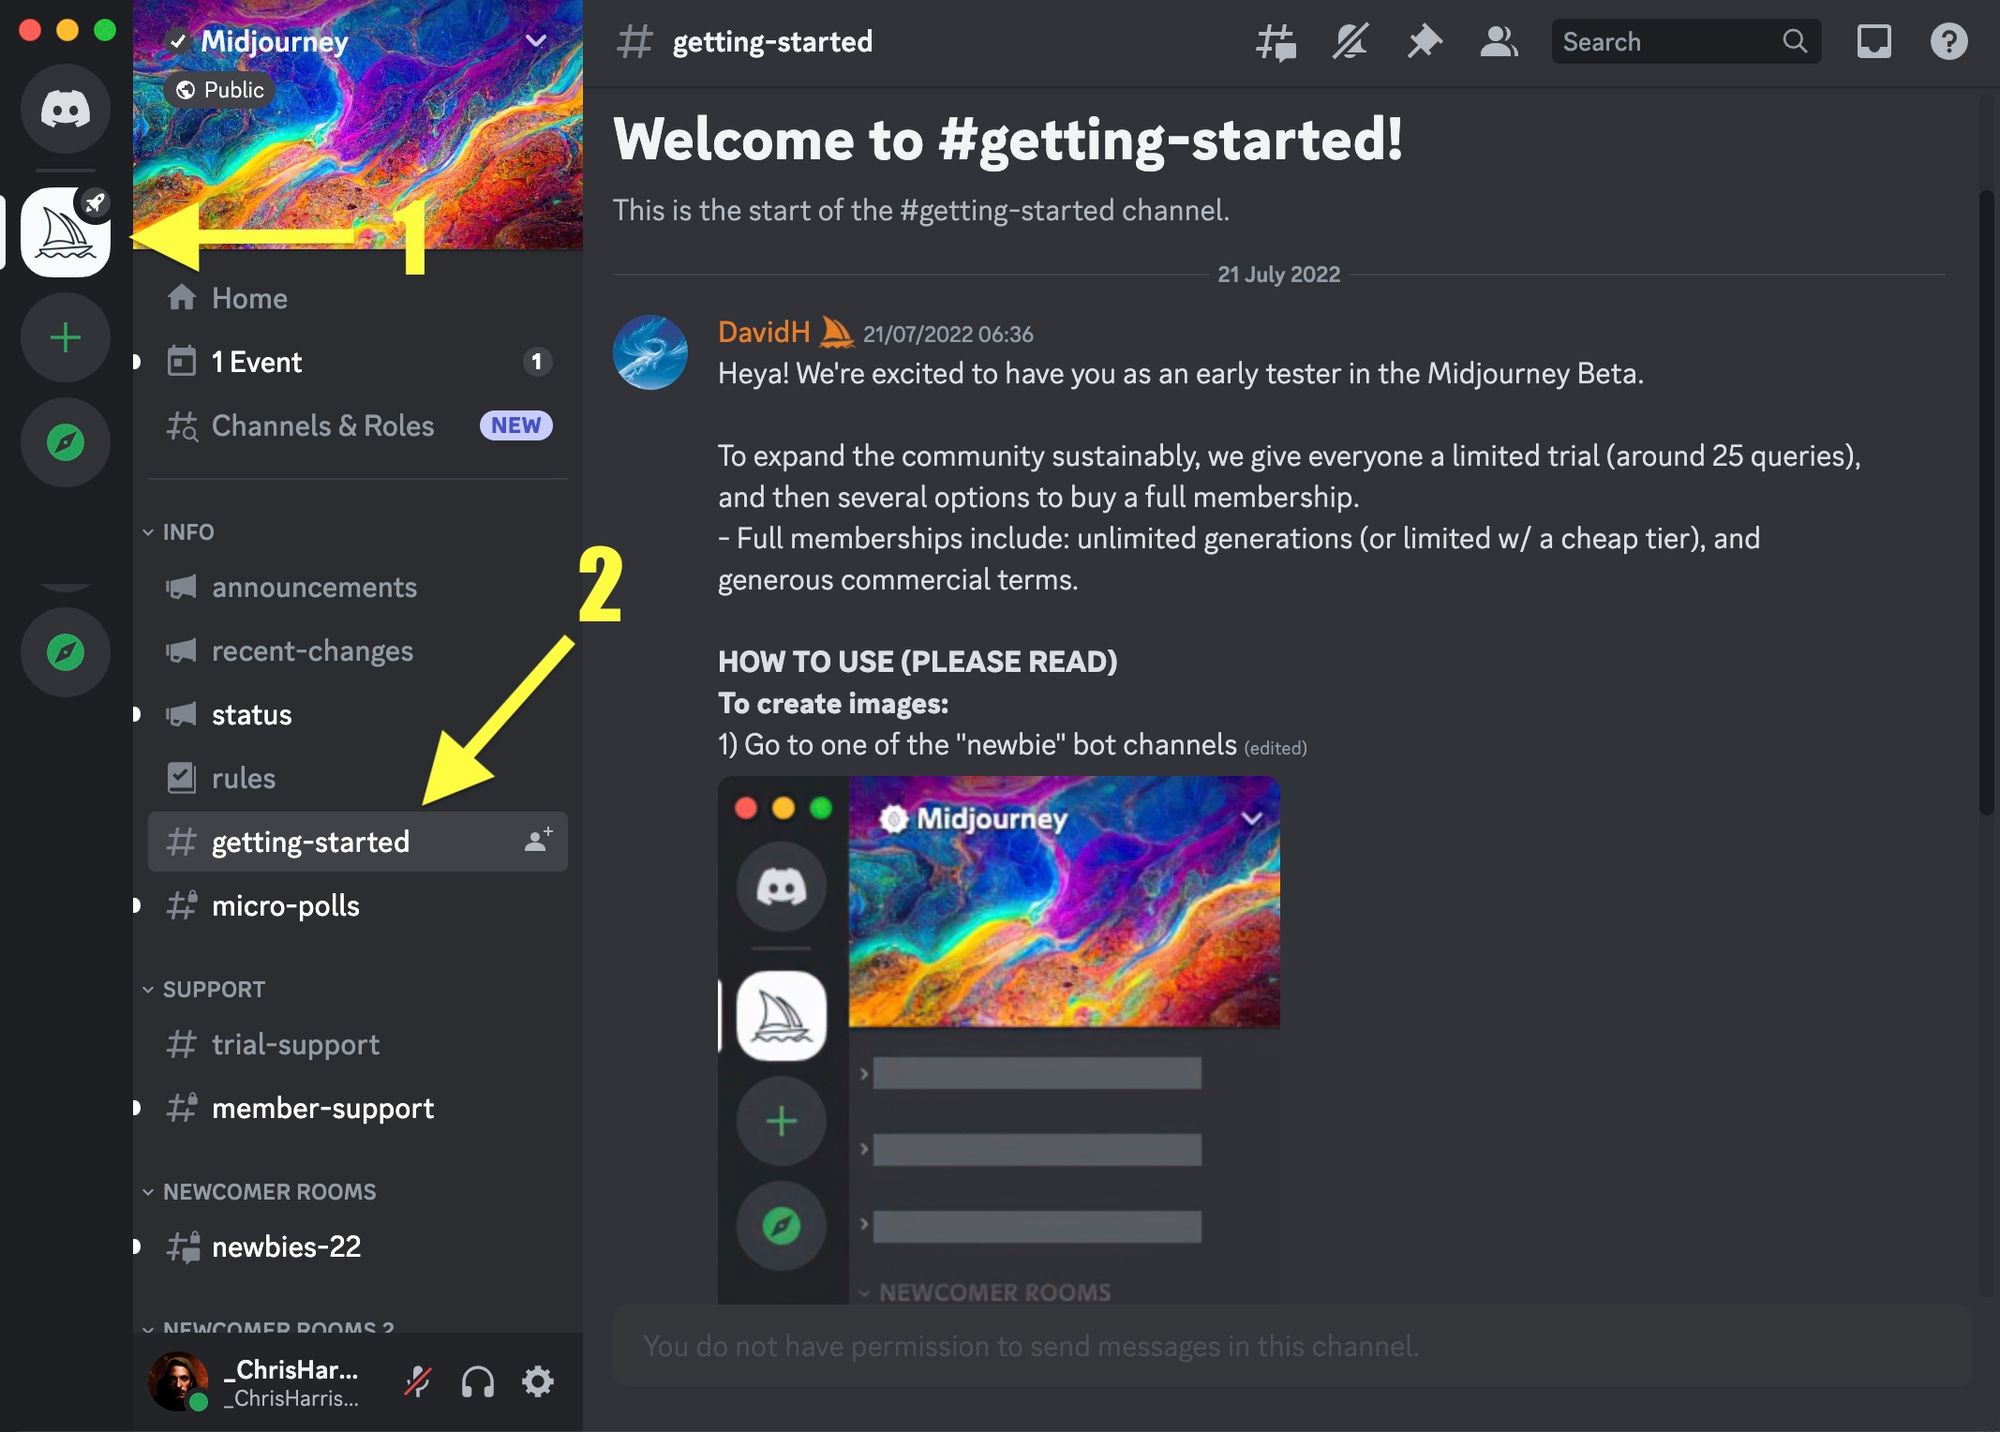
- Once this is done go to Midjourney.com and tap sign in using your new Discord credentials. This will create a Midjourney channel inside discord:
You'll start with a free trial which will allow you to try around 25 queries, after which you will need to subscribe.
Now you're in, you will be presented with numerous channels, so begin by picking one that starts with 'newbies'. Here you will find lots of other people like yourself trying out all sorts of image prompts to see what it can make. It's worth taking a moment to look at what they are typing and check the results they are producing, as you'll see some truly amazing imagery just scroll past in the feed! It's all free to use, there is no copyright, so if you see something you like, feel free to download it.
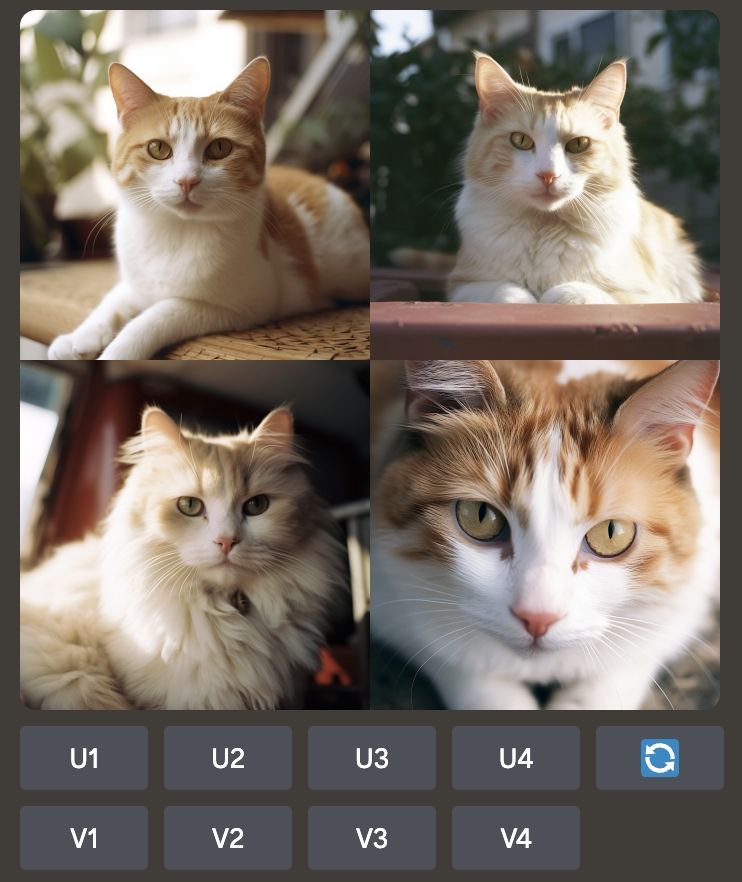
Simply start by typing "/imagine" into the chat, this will autocomplete for you to "/imagine prompt:" where you can now type a description of whatever you want to see. When you send the message the bot will reply back with four images. Just be aware that the 'newbie' channels move pretty fast so you'll need to keep track of your request as it scrolls upwards! After about thirty seconds you should see something like this:
Understanding parameters
Having a play with the above is great for the first few uses but it will quickly become clear you need more control. The first way to do this is through parameters. These are simply text commands starting with "--" added to the end of a prompt. The most useful is "--ar x:y" where x and y are two numbers determining the aspect ratio of the created image. "--ar 1:1" will create square images, "--ar 16:9" will create movie aspect or landscape, and "--ar 2:3" a portrait shape. The prompt FAQs channel will help you with further ideas.
Image references
Now we have the basics out of the way the best way to influence the final image is to pass it a link to an online image. In this case I decided to upload a cartoon sketch I created for Midjourney to use as a guide. To get the link I simply sent the image as a message into the Discord chat. This uploads it to Discord's servers and then you can click on the image to copy the url to the clipboard. You can then paste it into your prompt:

Here's what you get if you send the URL of the image along with the prompt. Copy and paste from the caption below to try it yourself.
The biggest issue with creating content on Midjourney is understanding which keywords are likely to produce the best results. As we determined earlier, the network is trained on an image but it is the keywords associated with the trained image that actually determine both the style and the content of the output. Let's take this example a bit further.
Below I have enhanced the fantastical and movie-like qualities by adding these keywords:
Close up, Foggy, Overcast skies, No sun, Soft Lighting, Accent Lighting, Global Illumination, Anti - Aliasing, FKAA, TXAA, RTX, SSAO, Shaders, OpenGL, Shaders
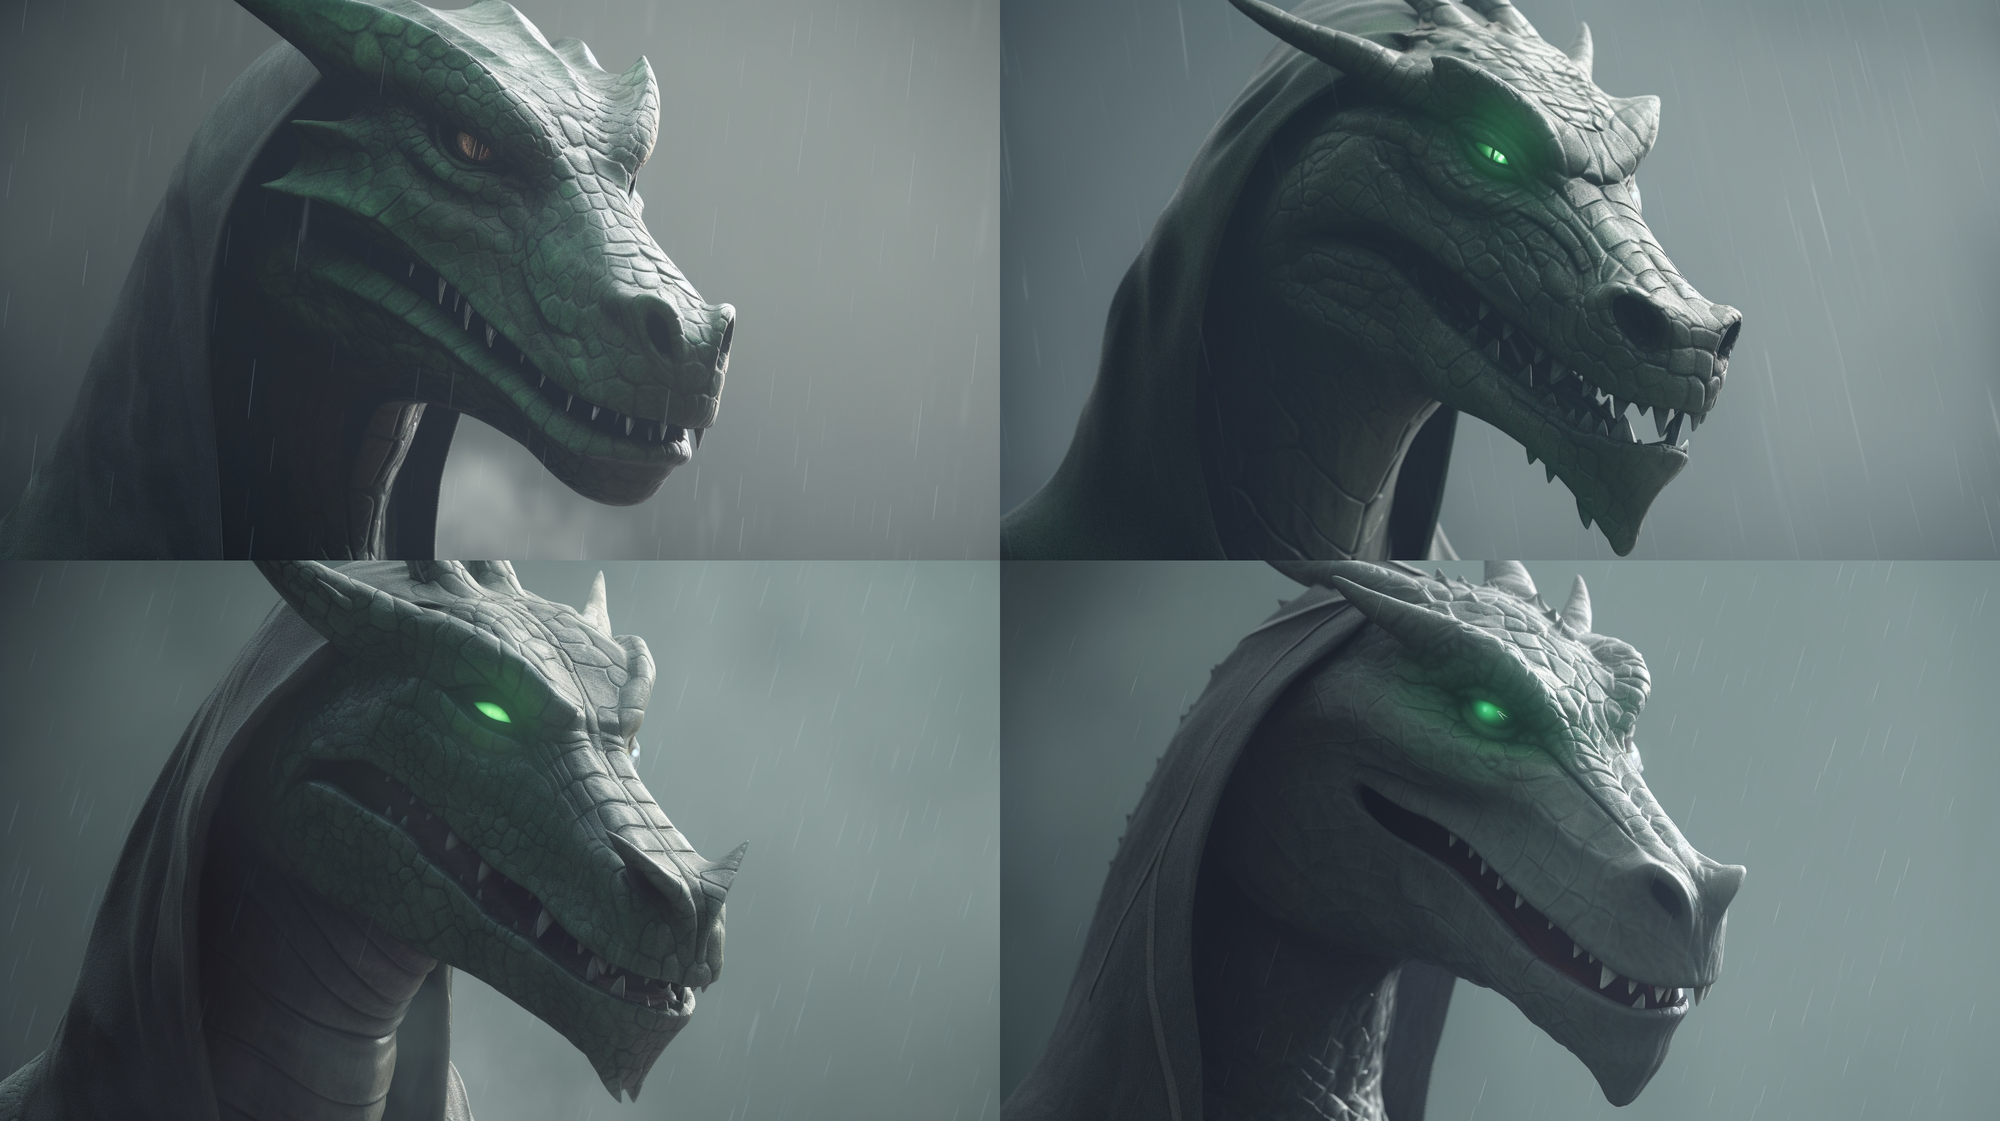
As you can see the results are dramatically better but why do they work? Well the answer is that all of these terms are associated with imagery produced by game rendering and animation. OpenGL for example, is a graphics rendering API (Application Programming Interface) for creating real-time graphics for computer games. The result looks far more detailed than a standard OpenGL game would produce but the keyword moves the result into the fantastical as the character now has glowing eyes, many more teeth and it is raining moodily.
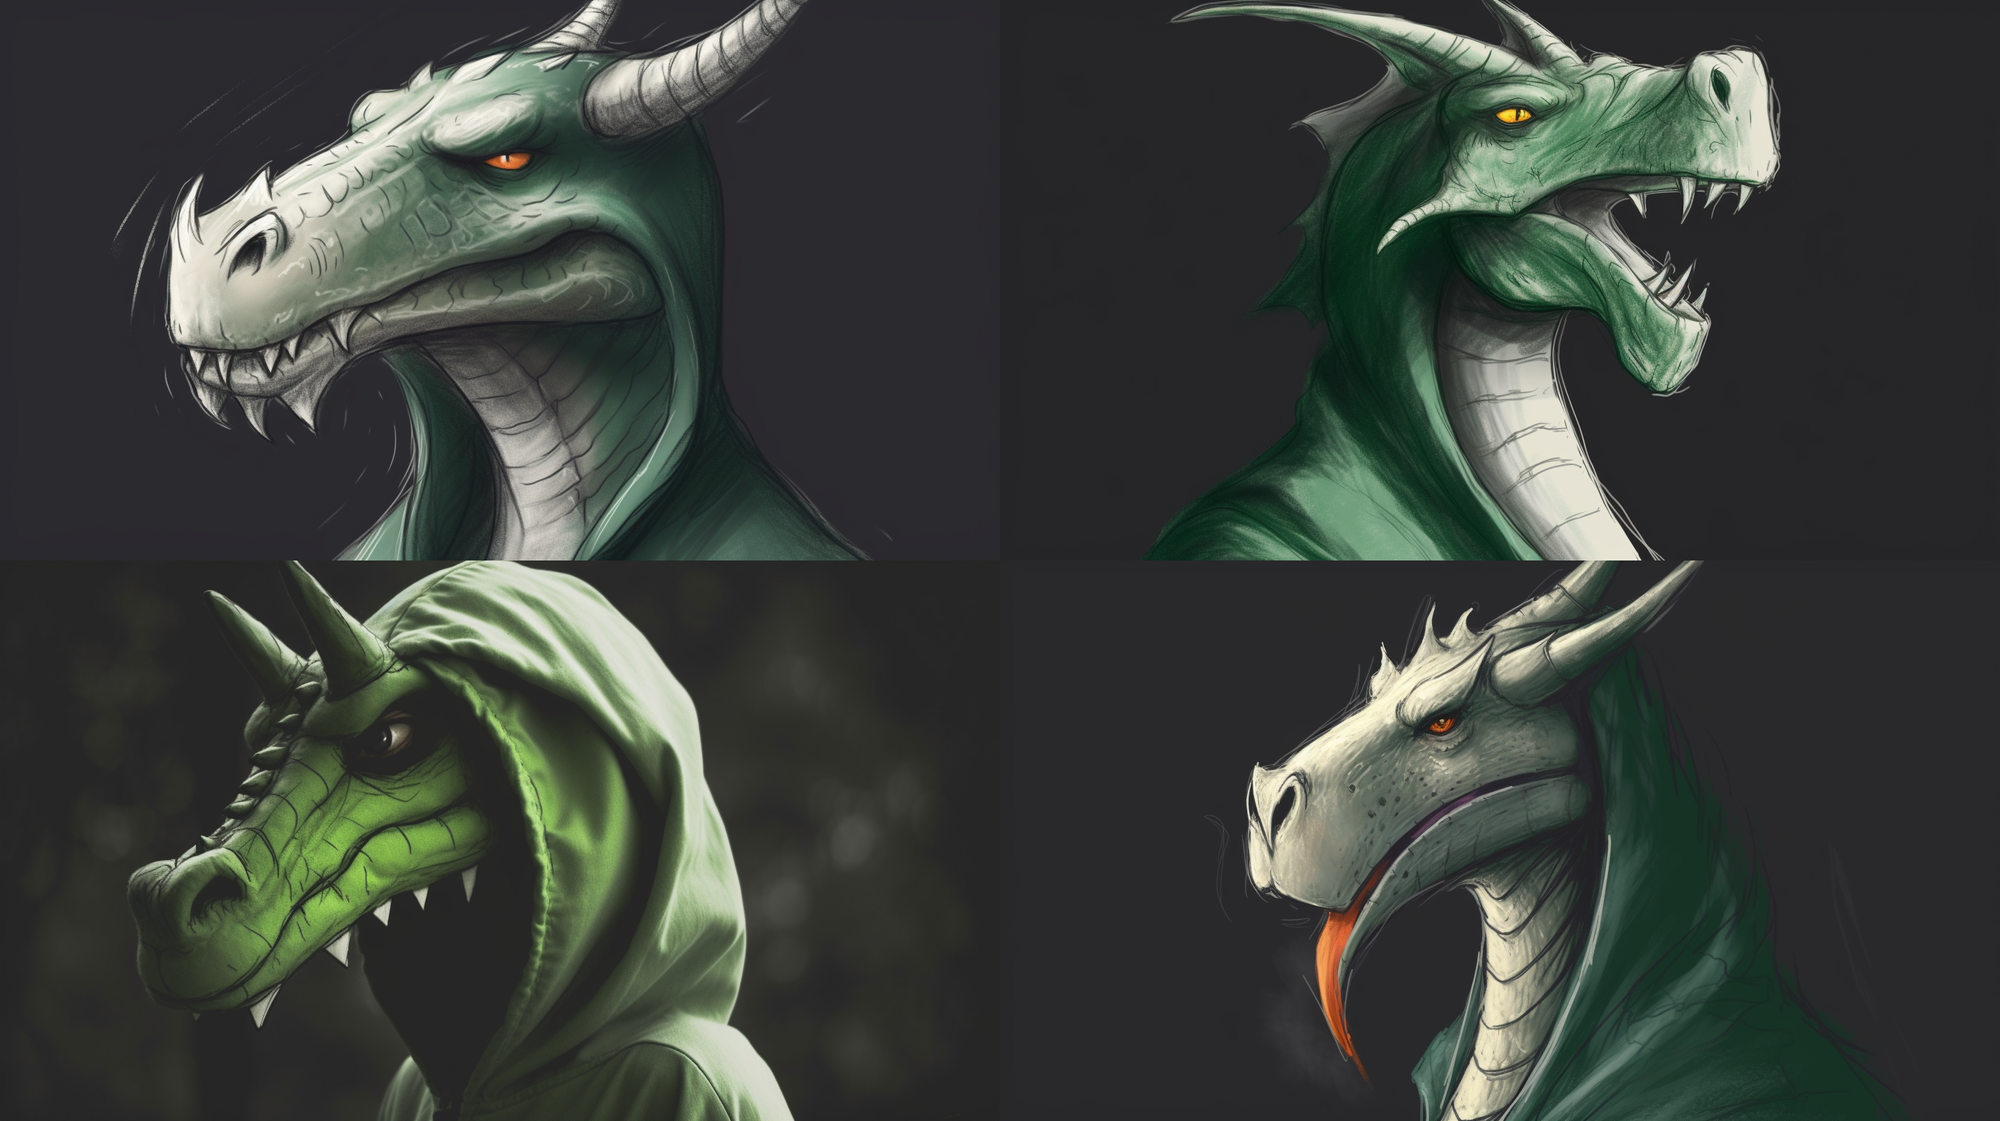
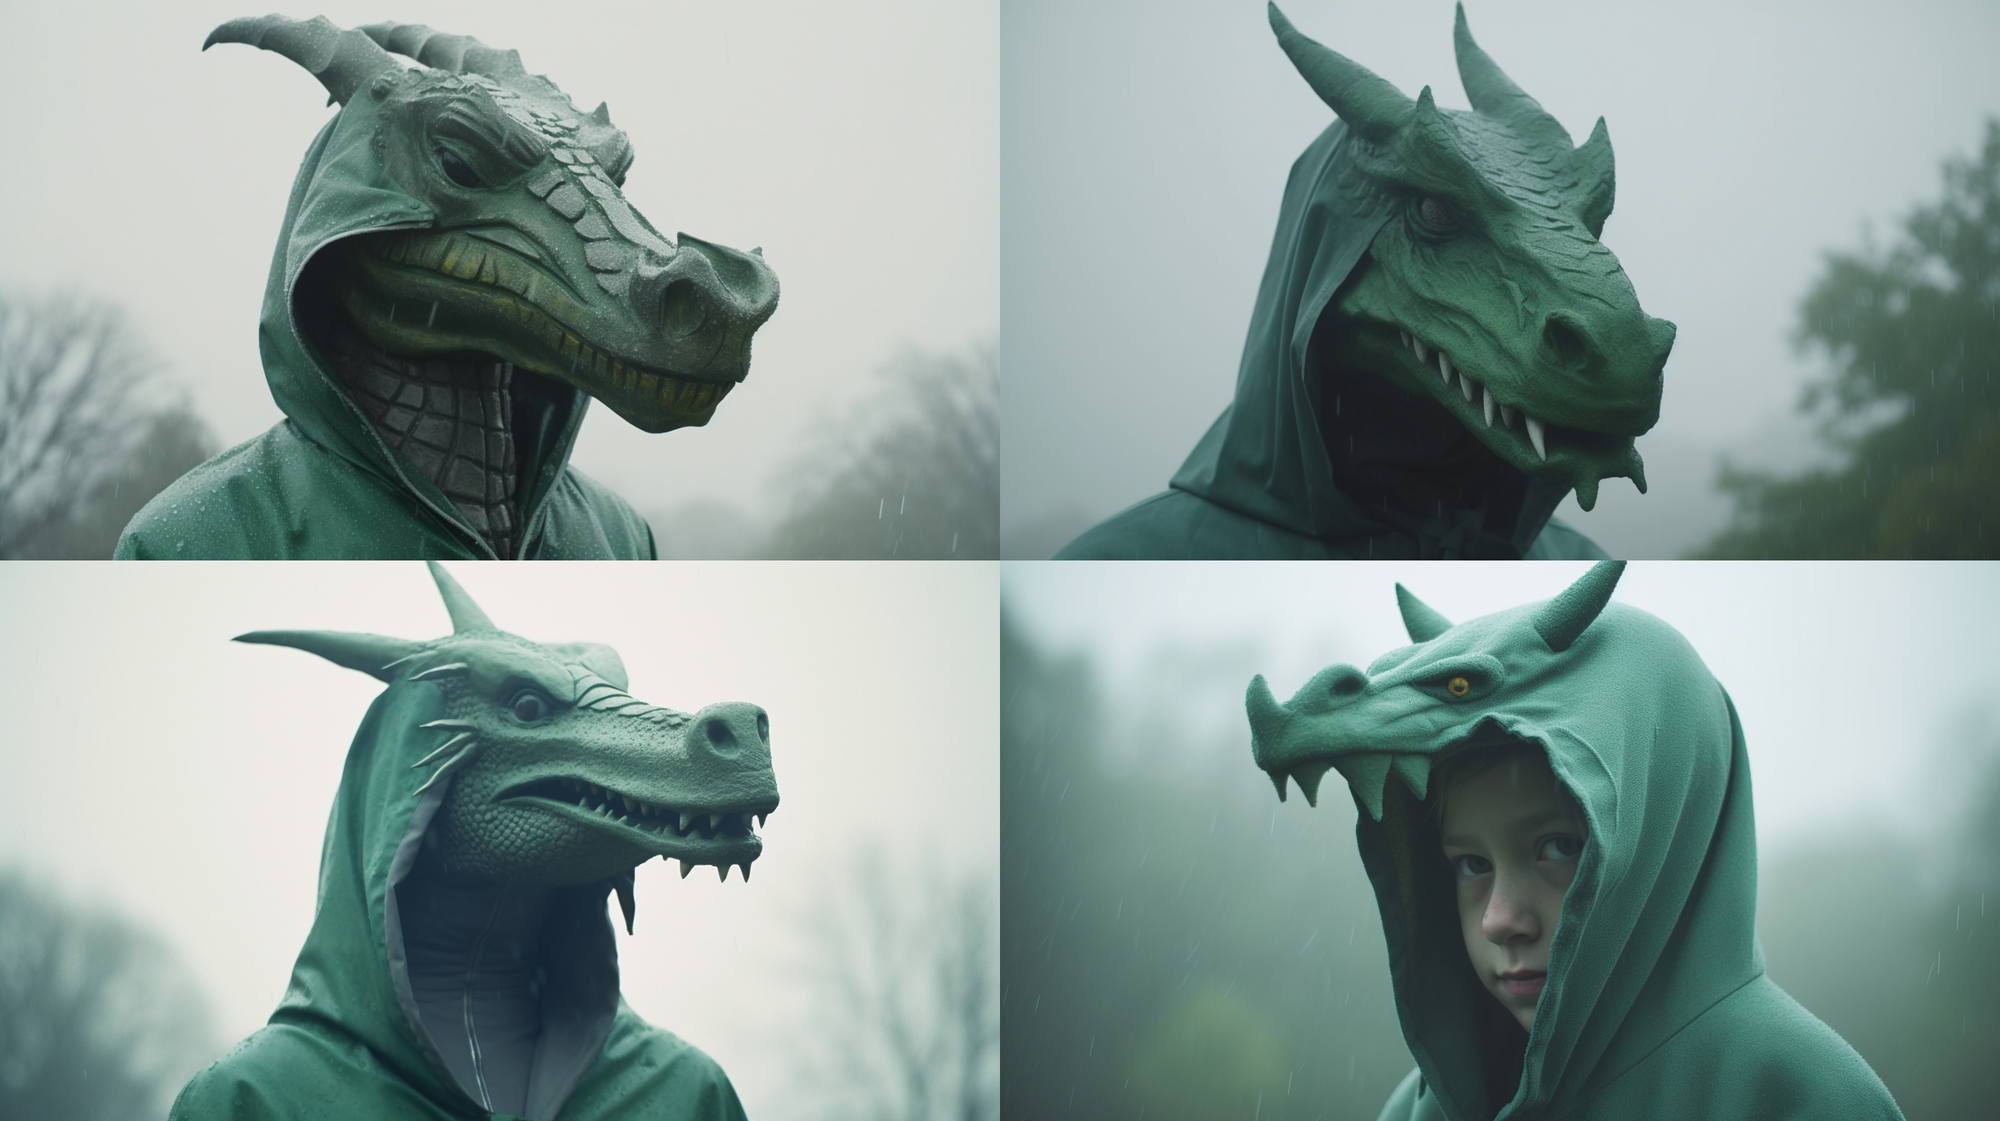
Now let's try a different set of stylistic keywords and see how it affects the outcome:
Close up, Foggy,Overcast skies, No sun, Soft Lighting, 35 mm film still shot on Kodachrome
This time we are using the keywords associated with real film stock and still photography. Again the results are dramatically different but this time it has pushed the image into a more realistic interpretation of the sketch. Since dragons are fantastical creatures and Kodachrome is a physical camera filmstock it has created a real-life interpretation instead. See how it has added a boy in a hood or made the others look like costumes with masks.
Thoughts
Midjourney is an amazing tool and the detail it can create is truly spectacular, but the keywords push the output down very particular paths. You have to know, try or copy keywords that other users have found successful. Even when you know the right keywords, particular words can not only have stylistic influence on the image but they can change the content of the image too.
A key example of this is shown in the images above. Scroll back up and take a look at the how the dragons look in the 'OpenGL' image. Notice how the character is not wet even though it is standing in the rain. You might think that this is becuase it is too hard for Midjourney to create rain on the character, but that's not true. It has no trouble doing that for the anorak wearing character in the 'Kodachrome' shots above. Instead the character is dry because the computer generated images it was trained on don't typically have rain-soaked characters as that is a harder result for computers to render.
While I applaud Midjourney for bringing such an amazing and useful tool to market, I personally find it very difficult to use for my proffesional work. The simple reason is that design is an intentional process. When I create designs I am very deliberately placing elements onto the page in very specific positions. With Midjourney, it's very much a roll of the dice as to whether you will create something usable. This makes relying on it very difficult.
But there is hope. In my next post I will talk about what Adobe is doing with generative AI to help designers address this very problem.